


Some time ago, I had a request from one of my colleagues to help automate a rather repetitive and might I add, highly prone to error, process. One of the clients required her to fill in the same form several times in a day, manually, and then send it back for approval and signing. Of course, I’m simplifying a bit but that was what it was in essence.
The layout of the form remained relatively consistent — company logos, contact info, names, addresses etc.. The usual application form kind of fill in the blanks. Rather than re-inventing the wheel and creating a fancy website for the client to fill in details and generate a form, I turned to Google Forms. It’s a nice quick easy way to create an online form; you can even add client logos and make it look all professional.
Now, there are a lot of good PDF generator extensions for Google Forms already out there but data confidentiality was of the essence to me and I wasn’t very clear on how the data passes through when using an extension. With some digging around, I do understand (but I could be wrong) that the script when made into an extension would still be hosted on the script owner’s account. So maybe it’s possible that the data does go through their system. I’m not sure so hence I just decided to build my own. Plus I get to customise it how I want.
I should say here that there are many different ways this can be done and there are quite a few little tricks one can find online for Google Apps Script. I have tried to cover as many as I could in this tutorial so your requirement might vary and you might not need everything outlined here.
So let’s begin…
I’m going to use a simple Invoice generation form. So let’s say I’m a freelancer who needs to generate some nice looking invoices (without paying other services for it), then I could implement this on Google Forms.
This is what a sample invoice might look like:
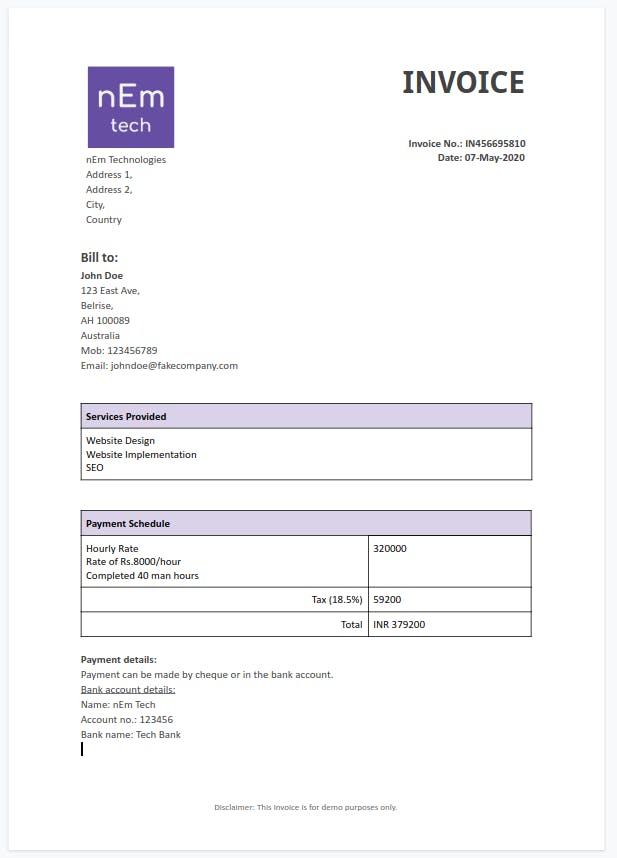
In this scenario, the Google Form is only used by me, the freelancer, to generate the invoice and optionally send it to the client via my email.
What do you need?
Just a GMail account really. And some javascript knowledge for the scripting. Although, anyone should be able to manage this tutorial as I’ve made it quite explanatory.
You will be creating a Google Form which is linked to a Google Sheet, and a Google Doc for the invoice template. We will then be using Google App Script to write a script in the linked spreadsheet which will take the data and put it into the template, make a PDF and optionally, send it to the client via email.
Outline of major steps
- Create a Google Form
- Link it to a Sheet
- Create template file
- Create the script
- Link Form Submit event to the form
Create a Google Form
Before you start creating your form, it’s probably a good idea to figure out what you want to put in that form. Depending on the complexity (whether there are conditional questions), it might be good to have a flowchart of the form.
Note: Conditional questions on your form are questions that will point the user to a different page of the form based on the answer they select. For this tutorial, As you can see the payment schedule has a condition — if it’s hourly then enter the rate and total number of hours worked or if it’s a fixed price for the project then enter the agreed upon cost.
Let’s take the invoice example. The problem I am trying to solve is this: I’m a freelancer who needs to generate invoices for my clients. I do quick small projects and my information tends to remain the same in each invoice except for the client details.
So here are a list of things that will depend on the client (these are the things that will go on the form):
- Client’s details:
Name Email Mobile/Telephone Address - Payment schedule or type:
Hourly rate Fixed rate - Services rendered
These are things that probably remain constant (these items can be put directly into the template):
- My company name and logo
- My name
- Company address and contact details
- My bank account details to receive payments
- Tax rates
Then, we might have some consequential data — data that we don’t really need to ask on the form because we can do simple calculations on our own to get them (this will take place in the script):
- If hourly rate is selected, then we need to calculate the total cost — hourly rate * number of hours worked.
- Apply tax and calculate the total payable amount.
- An invoice ID
- The date
- Maybe write the total payable amount in words or you might want to give the price in an alternate currency, so you can get the latest rate and convert it accordingly.
The form is meant to be straightforward with only the bare minimum requirements. It will be prone to fewer errors, if we leave the calculations for the script.
IMPORTANT NOTE: This is extremely important. The titles that you create for each question… it’s important to keep them simple and not to change them very often. This is because when the form data is submitted, we will use those titles to reference the data.
So head on over to your Google Drive and create your form. As this isn’t a tutorial on creating Google Forms, here is a handy link — https://support.google.com/docs/answer/6281888?co=GENIE.Platform%3DDesktop&hl=en It’s quite self-explanatory and you can try experimenting a bit with it.
Unfortunately, I can’t share the Google Form I created for this tutorial because Google doesn’t allow a view-only option for forms.
Test the form. You can open the actual form by clicking on the Preview button on the top-right (shaped like an eye). This is the form that you will actually use to submit data or share with someone else if they are entering the data. Once you click Submit Form, you can head over to the editing form page to see if your responses were recorded.
Link Form to a spreadsheet
Now that you have your form ready (and I hope you have thoroughly tested it out especially if you have conditional questions), we should link it to a Google Sheet. The reason we do this is so that the data that is submitted via the form can be placed into nice rows and columns. And this is important because if we are going to run scripts on this data, it’s good to have the data well-organised.
- Open your Google Form
- On the top, you will see two tabs: Questions and Responses
- Click Responses
- On the top-right, you will see the green Google Sheet logo. Boxed in yellow below:
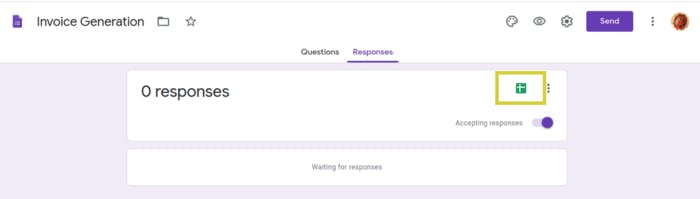
- Once you click that, it will ask you if you want to create a new spreadsheet or use an existing one. Select new.

The spreadsheet will have the same name as your Google Form along with (Responses) appended to it. The file can be found in the same Google Drive directory/folder as your form.
That’s it!
Now when you open the Responses spreadsheet, you will see that the columns have already got the headers according to the questions in your form. Each form submission will be saved as a row.
Create the template
The invoice template is used to generate new invoices with the client data you submit via the form. It will be good to have a single template that can just replace the variable data and churn out invoices as and when. The template will also help standardise your invoices and when you need to make a change, it’s easy to do it in one place so that the next invoice has the new design.
- On your Google Drive, create a new Google Doc. It’s probably better to have it in the same directory as your form but it is not required to be so. The reason why I say the latter, is because you might want the template in a shared directory where your teammates can edit the template. But it’s probably better to keep the form private so that not too many people are editing it and your script will start to fail.
- Design your template, add your logo, make it pretty. There are tonnes of examples available online.
- Once you have an idea of how you want to design it, the next thing to do is place markers on all the text that needs to be substituted with the form data. We need a way for the script to know what should be replaced on the template with what. Client’s name needs to be replaced with the client name entered on the form, and so forth. To do this we use curly braces like so:
For example, you want to make your client name replaceable, then do this:
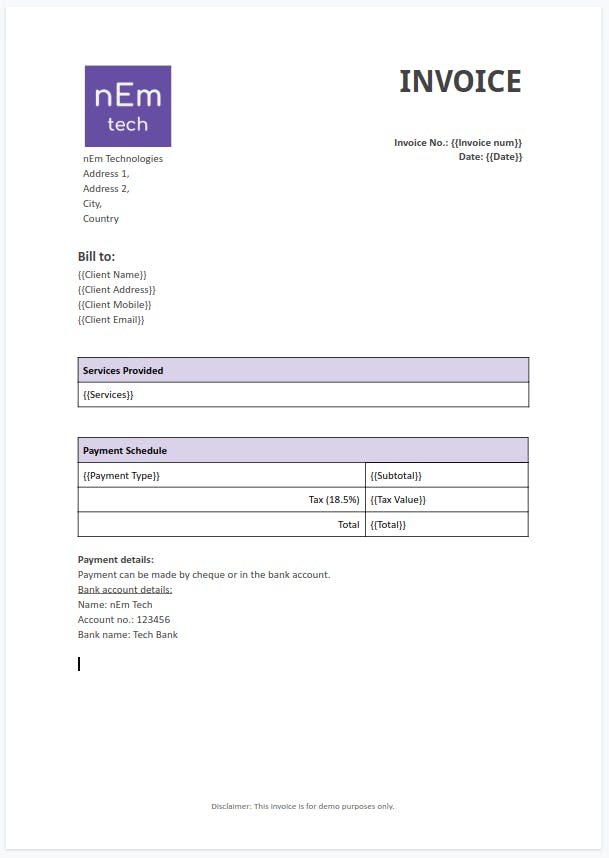
{{Client Name}}or whatever else you want to call it. Name, CName, My Client. That doesn’t matter. But once you pick a name, try and stick to it because the script will need to reference it. - Similarly do this for all the data you want to replace: address, date, total payable, invoice ID etc. but leave the data that will remain consistent through all the invoices such as your own name, address, logo, bank details for making the payment etc. See my template image below.
- Another point to keep in mind is that whatever formatting (font, bold, italics, font size etc.) you give to the variable in curly braces, that’s the format that will be used when the text is replaced. So if,
{{Client Name}}is written in bold on the template, then when the script replaces that with the actual name, it will also be written in bold. - This will probably make a lot more sense, if you see the template I have created for the invoice — https://docs.google.com/document/d/1U8ELF6WNrod6PLozpcVsdBK_BxY_dviJk-aIZM5d4nk/edit?usp=sharing
Note: The double curly braces is something I have chosen to use. You could use
[[Client Name]]if you preferred as well. It just needs to be something unusual and unique so that it can be easily used to replace the data.
Create the script
Here come’s the heavy lifting. It was all easy so far. We need to write a script that will be executed the moment someone submits the form. This script will be in the Responses spreadsheet that we created in the previous step.
Here is a general outline of the steps we need to cover in the script:
- Get all the data that was just submitted
- Do any other calculations that we would need. This is what I mentioned as consequential data above.
- Now that all the information is ready, we can put into the template and have an invoice ready. These invoices will be created in the same folder as your Responses spreadsheet. You can direct them to another folder if you like to be organised that way :)
- Optionally, email a copy to yourself and the client. When you do this, please remember that you won’t have a chance to look it over yourself before sending it.
So let’s start working on that script. If you’re not interested in the step by step explanation of the script, just scroll down to get the complete script.
Submitted data
- Head on over to your Responses spreadsheet
- Click Tools
- Select Script editor
- This will open a new page with an Untitled project heading
- First, let’s give this project a title. In the top-left, enter something suitable. I’m going to call mine InvoiceGen Script.
- Next, we create an empty function called
onSubmit:function onSubmit(e) { } - The first few things we need to do is get the data from the event object
e. This will be all the data entered on the form and also a reference to the spreadsheet that is linked to the form:function onSubmit(e) { const rg = e.range; const sh = rg.getSheet(); } - Now we get all the data submitted in the form. The object
ehas a 2d array callednamedValueswith the form data. Append this code to theonSubmitfunction://Get all the form submitted data //Note: This data is dependent on the headers. If headers, are changed update these as well. const cName = e.namedValues['Client Name'][0]; const cEmail = e.namedValues['Client Email'][0]; const cAddress = e.namedValues['Client Address'][0]; const cMobile = e.namedValues['Client Mobile'][0]; const sendCopy = e.namedValues['Send client a copy?'][0]; const paymentType = e.namedValues['What is your agreed upon payment schedule?'][0]; const fixedCost = e.namedValues['What was your agreed upon cost for the project?'][0]; const hourlyRate = e.namedValues['Hourly Rate'][0]; const manHours = e.namedValues['Total man hours'][0]; const services = e.namedValues['Select the services'][0];
You will notice here that we use the headers from the columns in the spreadsheet or the question in the form as a way to identify the data — 'Client Name' , 'Client Email' and so on.
From here on, all code snippets are appended into the onSubmit function.
Consequential Data
This is the data we are going to calculate based on what form data is submitted. And for good measure, I also copy the values into the spreadsheet so that it can be recorded for later.
//Consequential Data
const tax = 18.5
var subtotal = 0;
var taxAmt = 0;
var payableAmt = 0;
//if the user has selected hourly payment model
//Note: Be careful that the responses match the elements on the actual form
switch (paymentType ){
case 'Hourly Rate':
subtotal = hourlyRate*manHours;
taxAmt = subtotal * (tax/100);
payableAmt = +subtotal + +taxAmt;
break;
case 'Fixed Cost':
subtotal = fixedCost;
taxAmt = fixedCost * (tax/100)
payableAmt = +fixedCost + +taxAmt;
break;
}
const invoiceID = 'IN' + Math.random().toString().substr(2, 9);
var formattedDate = Utilities.formatDate(new Date(), "IST", "dd-MMM-yyyy");
So we are calculating a few things here:
- First, I have set a fixed tax rate. If you have varying rates, you can always store them on another sheet in the same spreadsheet and reference it in the script.
- Then based on the payment type, I have calculated the tax amounts and the total payable amounts. I used switch/case here just to demonstrate that you can also have many more payment types rather than having multiple if/else statements. Also, I’m sure there is a more efficient way of coding this particular part, but I wanted to demonstrate it step by step. For example, you could actually create another function that returns the tax and payable amounts since the formulae essentially remain the same.
- An invoice ID is generated using a random number generator. The ID is 9 digits long and starts with
IN. It’s upto you how you want to set up your IDs. - I’m using the date when the form is submitted. So it will automatically take today’s date and format it like so
07-May-2020.
For posterity’s sake, I’m going to save the invoice ID and the payable amount in the spreadsheet for later referencing. In order to do this, you first need to add two additional columns in the same sheet as your form columns. What I have done is, I create two columns at the end and then slide them over to write after the Timestamp column. This way, even if you change your form, these two columns wouldn’t move around too much. Don’t worry, by adding these two columns, your form data won’t get corrupted. The form only adds the data in the column where the form question title and the column header match.
 Payable Amount and Invoice ID are columns I have added. Client Name etc. are the columns added by the form
Here is the code to copy the data into the spreadsheet:
//Set the consequential data in the columns of the spreadsheet for record keeping
//Note: These variable are dependent on the sheet's columns so if that changes, please update.
const row = rg.getRow();
const payableAmtCol = 2; //B
const invoiceIDCol = 3; //C
sh.getRange(row,payableAmtCol).setValue(payableAmt);
sh.getRange(row,invoiceIDCol).setValue(invoiceID);
Create an invoice from the template
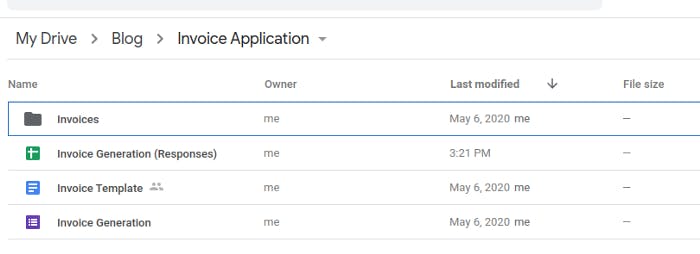
First off, I have created a separate folder to store my generated invoices. This is clean because you can always share this folder with others and still keep your script safe. This is what my set up looks like:
Once you have created your folder, we need to get the IDs of the Invoices folder and the Invoice Template. In order to do this, you need to open your file/folder and look at the bar on top. You will see something like this:
- File —
docs.google.com/document/d/1298wfhjnsdf98wherfj.../editThe ID is the gibberish of letters and numbers between the/ - Folder —
drive.google.com/drive/u/0/folders/293842h98r...The ID is the gibberish at the end after the/
You will need those IDs in your script to reference those objects.
//Build a new invoice from the file
//Folder and file IDs
const invoiceFolderID = '<your-invoice-folder-ID';
const invoiceFolder = DriveApp.getFolderById(invoiceFolderID);
const templateFileID = '<your-template-ID>';
const newFilename = 'Invoice_' + invoiceID;
//Make a copy of the template file
const newInvoiceFileID = DriveApp.getFileById(templateFileID).makeCopy(newFilename, invoiceFolder).getId();;
//Get the invoice body into a variable
var document = DocumentApp.openById(newInvoiceFileID);
var body = document.getBody();
Once we have copied the template file’s text into the body variable, we can start substituting all our curly braces’ objects:
//Replace all the {{ }} text in the invoice body
body.replaceText('{{Invoice num}}', invoiceID);
body.replaceText('{{Date}}', formattedDate);
body.replaceText('{{Client Name}}', cName);
body.replaceText('{{Client Address}}', cAddress);
body.replaceText('{{Client Mobile}}', cMobile);
body.replaceText('{{Client Email}}', cEmail);
body.replaceText('{{Services}}', services.split(', ').join('\n'));
body.replaceText('{{Subtotal}}', subtotal);
body.replaceText('{{Tax Value}}', taxAmt);
body.replaceText('{{Total}}', payableAmt);
You probably don’t see the payment type variable here. That’s because I wanted to add a slightly fancier message when the invoice is generated for an hourly rate:
//In the case of hourly rate payment type, let's add an additional message giving the rate and the man hours.
if(paymentType.includes('Hourly Rate')){
//It should look something like this on the invoice
//Hourly Rate
//Rate of Rs.1200/hour
//Completed 50 man hours
const message = paymentType + '\nRate of Rs.' + hourlyRate + '/hour\nCompleted ' + manHours + ' man hours';
body.replaceText('{{Payment Type}}', message);
} else {
body.replaceText('{{Payment Type}}', paymentType);
}
Lastly, and this is very important, the document needs to be saved and closed:
document.saveAndClose();
Send email with PDF attachment (optional)
On my form, I have created a question called send email to client? What this does is, the moment I create a new invoice via the form, it will automatically send it to the client attached as a PDF. This is great as long as you can keep in mind that you won’t have a chance to review the form before you send it. Generally, what I like to do is start off by not automating the process, but once the invoices look good to me, I directly send it to the relevant people.
//If you have selected to directly send it via email
if(sendCopy.includes('Yes')){
//send email with the file
var attachment = DriveApp.getFileById(newInvoiceFileID);
GmailApp.sendEmail(cEmail, '<subject>',
'<Body>',
{attachments: [attachment.getAs(MimeType.PDF)],
from:'<your-email>@gmail.com'});
This email will be sent out from the GMail account you are using to write the script. If you go to the Send part of your inbox, you will be able to see them. Alternatively you could also, use this section, to send yourself a PDF copy and then forward it to relevant parties.
You can also add cc, bcc etc. to your sendEmail function. Check out the Google App reference here- https://developers.google.com/apps-script/reference/gmail/gmail-app#sendEmail(String,String,String,Object))
If you don’t wish to use the send email option…
Alternatively, all your invoices will be saved in the folder once a form is submitted. You can always open it up there and send it however you wish. The invoice will be saved as a Google Doc so you will have all the same functionality — you can print it, save it as a PDF etc.
That’s it! You can check out the complete script below.
Complete Script
function onSubmit(e) {
const rg = e.range;
const sh = rg.getSheet();
//Get all the form submitted data
//Note: This data is dependent on the headers. If headers, are changed update these as well.
const cName = e.namedValues['Client Name'][0];
const cEmail = e.namedValues['Client Email'][0];
const cAddress = e.namedValues['Client Address'][0];
const cMobile = e.namedValues['Client Mobile'][0];
const sendCopy = e.namedValues['Send client a copy?'][0];
const paymentType = e.namedValues['What is your agreed upon payment schedule?'][0];
const fixedCost = e.namedValues['What was your agreed upon cost for the project?'][0];
const hourlyRate = e.namedValues['Hourly Rate'][0];
const manHours = e.namedValues['Total man hours'][0];
const services = e.namedValues['Select the services'][0];
//Consequential Data
  const tax = 18.5
  var subtotal = 0;
  var taxAmt = 0;
  var payableAmt = 0;

  //if the user has selected hourly payment model
  //Note: Be careful that the responses match the elements on the actual form
  switch (paymentType ){
    case 'Hourly Rate':
      subtotal = hourlyRate*manHours;
      taxAmt = subtotal * (tax/100);
      payableAmt = +subtotal + +taxAmt;
      break;
    case 'Fixed Cost':
      subtotal = fixedCost;
      taxAmt = fixedCost * (tax/100)
      payableAmt = +fixedCost + +taxAmt;
      break;
  }

  const invoiceID = 'IN' + Math.random().toString().substr(2, 9);
  var formattedDate = Utilities.formatDate(new Date(), "IST", "dd-MMM-yyyy");
  //Set the consequential data in the columns of the spreadsheet for record keeping
  //Note: These variable are dependent on the sheet's columns so if that changes, please update.
  const row = rg.getRow();

  const payableAmtCol = 2; //B
  const invoiceIDCol = 3; //C

  sh.getRange(row,payableAmtCol).setValue(payableAmt);
  sh.getRange(row,invoiceIDCol).setValue(invoiceID);
//Build a new invoice from the file
//Folder and file IDs
const invoiceFolderID = '<invoice-folder-id>';
const invoiceFolder = DriveApp.getFolderById(invoiceFolderID);
const templateFileID = '<template-id>';
const newFilename = 'Invoice_' + invoiceID;
//Make a copy of the template file
const newInvoiceFileID = DriveApp.getFileById(templateFileID).makeCopy(newFilename, invoiceFolder).getId();;
//Get the invoice body into a variable
var document = DocumentApp.openById(newInvoiceFileID);
var body = document.getBody();
  //Replace all the {{ }} text in the invoice body
  body.replaceText('{{Invoice num}}', invoiceID);
  body.replaceText('{{Date}}', formattedDate);
  body.replaceText('{{Client Name}}', cName);
  body.replaceText('{{Client Address}}', cAddress);
  body.replaceText('{{Client Mobile}}', cMobile);
  body.replaceText('{{Client Email}}', cEmail);
  body.replaceText('{{Services}}', services.split(', ').join('\n'));
  body.replaceText('{{Subtotal}}', subtotal);
  body.replaceText('{{Tax Value}}', taxAmt);
  body.replaceText('{{Total}}', payableAmt);
//In the case of hourly rate payment type, let's add an additional message giving the rate and the man hours.
  if(paymentType.includes('Hourly Rate')){
     //It should look something like this on the invoice
     //Hourly Rate
     //Rate of Rs.1200/hour
     //Completed 50 man hours
     const message = paymentType + '\nRate of Rs.' + hourlyRate + '/hour\nCompleted ' + manHours + ' man hours';
     body.replaceText('{{Payment Type}}', message);
  } else {
    body.replaceText('{{Payment Type}}', paymentType);
  }
document.saveAndClose();
//If you have selected to directly send it via email
if(sendCopy.includes('Yes')){
//send email with the file
var attachment = DriveApp.getFileById(newInvoiceFileID);
GmailApp.sendEmail(cEmail, '<subject>,
'<body>',
{attachments: [attachment.getAs(MimeType.PDF)],
from:'<your-email>@gmail.com'});
}
}
Link Form Submit event to the form
Ideally, the script should run every time data is submitted on the form. In order to do this, we need to tell the Google App dashboard that this script is linked to the form for when the form is submitted. In short, we need to create a form submit event on the Google App dashboard.
- Go to your app dashboard — https://script.google.com/home
- Make sure you are under My Projects by checking on the menu on the left.
- Click on your invoice script. In my case, it is called InvoiceGen Script.
- Under Project Details on the right, click on the settings icon (3 vertical dots).
- Select Triggers.
- Click Add Trigger.
- Enter the following details:
Choose which function to run: onSubmit Choose which deployment should run: Head Select event source: From spreadsheet Select event type: On form submit Failure notification settings: Notifty me immediately (this is upto you really) - Click Save
- At this point, a window will open and ask you to select a GMail account. Select the one you have built this script with.
- It will then give you an unsafe to proceed warning. Click Advanced.
- Click Continue to InvoiceGen…
- Next, it will say that the script wants to access your Google account and give you a list of permission requests. This is because our script access the drive and does things to it. So it’s telling you that ‘I hope you know this script because it’s going to play with your Google account’. Don’t worry as long as you’re the author of this script, you’re fine. Click Allow.
- Your trigger should be added on the list on your dashboard.
Note: You can also use the App dashboard to check for any errors or failures when you are playing around with this. Rather than waiting for the notification in your email.
And you should have everything running now. Head on over to your form’s live view. Submit a form and check out the awesome invoice generated in your drive.
You can apply this to a variety of applications. Invoice is just one example. You can use it for application forms, registering new clients, feedback forms, performance reviews… you name it.
Thank you all for the support on all my blog articles. I hope this one finds you well. As always, please post any feedback/questions/edits/suggestions. You can also tweet out to me — twitter.com/neha_m25