


A friend and I wanted to explore this hype around NFTs and the best way to learn something is to try and build it yourself, right? But this tutorial is not about NFTs because on this journey I got pulled, rather sucked, into the world of decentralised web and naturally, IPFS.
I am absolutely loving learning about IPFS and its abilities. Although, relatively young, the tech is so bludy fascinating. The idea of a decentralised web is not that young though. People have been discussing it for a while — I even found a patent dating back to 2004 on a very similar concept.
This tutorial is about running your very own node with a spare, maybe old, Raspberry Pi. You can read the theory behind IPFS in their docs which are very extensive and informative. They even have a series of video lectures as part of IPFS Camp that I highly recommend, especially core A and core D. I also suggest running IPFS Companion if you are interested in a quick node on your desktop which has a nice UI to play around with. This tutorial is for a headless build of an IPFS node so it will be focused on command line actions.
Why this tutorial?
Personally, it was for me to learn IPFS a bit better and it’s a lot more fun to have a project working towards something. But the more I learnt about it, the more I wanted to support it.
Running an IPFS node helps you contribute towards the network; even if you provide a mere 5GB storage. Whether decentralised web is the future or not, I can’t comment on that, but I do think it’s a technology worth exploring. By running a node, you are expanding the network and being part of something innovative.
The traditional web that you and I probably use on a daily basis works in a centralised manner. When you upload a file or launch a website, it is hosted somewhere on a computer. Every time you access that asset, you connect to that computer and download it. If this computer is geographically far then the asset takes longer to download. Decentralised web is the opposite of this. Everyone hosts a bit of your asset on their computers (IPFS nodes) and ideally a good algorithm will download your files from nodes that are geographically closer to you. IPFS takes care of all of this, identifying the nodes closest to you, distributing your asset on the nodes etc. This is very important for network efficiency.
It’s also important in the situation when that one computer on a centralised web goes down or is hacked, there is a single point of failure. Not to mention trust in whoever is hosting your assets for you. Now if you were paying attention you might say but IPFS hosts bits of your file across random people’s nodes?! These bits are indecipherable by the host computer and they only have small bits of your asset, not the whole file.
My description here is very naive so before the die-hards pounce on me, I want my tutorial targeted to the average tech user. So I’ve kept my explanations simple but as always I am open to suggestion and improvement.
Lastly, and most importantly, why this tutorial? Because the full form of IPFS is InterPlanetary FileSystem. If that doesn’t make you itch to get involved, I don’t know what will.
What you will need
Let’s get into it before I ramble any further.
- A Raspberry Pi: this is a good opportunity to use an old model since IPFS doesn’t have extravagant hardware requirements.
- An SD Card: I used a 16 GB. 5 GB of that I allocated to IPFS.
- An internet connection: preferably with access to your router
- A host computer for you to set everything up: I use Ubuntu so this tutorial will lean towards that
- A memory card reader: either in your host computer or an external reader
Steps
- Flash SD card with OS
- Setup WiFi and SSH for the Pi
- Connect to Pi using SSH
- Install IPFS
- Configure IPFS node
- Pinning files to your node
Flash SD card with OS
Before connecting the Pi to a power source, we will need to setup an OS on the SD card using your host computer. I use Etcher to flash the SD card. It’s good and easy to use, and is available for any operating system.
- Download latest Raspberry Pi OS on your host computer — https://www.raspberrypi.org/software/operating-systems/ Note: As this is a headless setup (no monitor, keyboard or mouse will be connected to the Pi), I am using Raspberry Pi OS Lite.
- Extract the image file
- Launch Etcher
- Insert SD card into memory card reading
- Etcher should automatically read your SD card. Make sure it is that and you aren’t flashing something you aren’t supposed to
- Select the image file, you just extracted, on Etcher
- Click Flash!
Note: If you need more help — raspberrypi.org/documentation/installation/..
Setup WiFi and SSH
To avoid connecting the pi with peripherals (monitor, keyboard, mouse), I decided to set up the WiFi headlessly. You will have to do this while the SD card is still in your computer.
Note: If you are directly connecting the pi via an ethernet cable, you can skip this section.
Find your network
First, we need to find the ESSID of your WiFi network. This will be very similar to the name of your WiFi and most likely will be the same
- Enter the following in the terminal of the computer you are using (once again, assuming you are using a Linux based machine):
iwconfig - Note down the ESSID and make sure you have your WiFi password handy.
Adding network config to your pi
When adding the WiFi password to your Pi’s config file, we need to create an encrypted form so that a spy can’t simply find your password in plain text,
Enter the following in the terminal to get the encrypted PSK:
wpa_passphrase "MyWiFiESSID" "MyWiFiPassword" >> wpa_supplicant.confTwo things are happening here:
wpa_passphrase "MyWiFiESSID" "MyWiFiPassword"will create a network profile with your password replaced by a token so that it is not saved as plain text.>> wpa_supplicant.confwill add the network profile to your configuration file.Now we need to remove the plain text password that also gets copied into the config file. In the terminal:
sudo nano wpa_supplicant.confYour WiFi profile will look like this:
ctrl_interface=DIR=/var/run/wpa_supplicant GROUP=netdev
update_config=1
country=IN
network={
ssid="MyWiFiESSID"
#psk="MyWiFiPassword" #Delete this line
psk=131e1e221f6e06e3911a2d11ff2fac9182665c004de85300f9cac208a6a80531
}
Remove
#psk="MyWiFiPassword"and add the top 3 lines, if they are missing. Make sure you add your two letter country code .- Save it. Ctrl + O, Ctrl + X
- Copy
wpa_supplicant.confto thebootpartition of your flashed SD card.More info can be found here — https://www.raspberrypi.org/documentation/configuration/wireless/headless.md
Enable SSH
Now that the WiFi configuration is set up, we still need a way to access the pi over the network to avoid connecting the peripherals — so we need to enable SSH before we actually start up the raspberry pi.
Create a file called ssh with no extension and put it in the boot partition of the SD card — same place as the wpa_supplicant.conf file.
You can open a terminal in the boot partition and enter the following command:
touch ssh
More info can be found here — https://www.raspberrypi.org/documentation/remote-access/ssh/README.md
Connect to Pi using SSH
Finally, the setup for the pi is ready. Now you can connect it to a power source. It should automatically connect to the network since we did the setup of it in the last couple of steps. It took a couple of restarts for it to connect to the WiFi and have the SSH running.
In order to connect to it from your host computer, you will use SSH but that requires the pi’s IP address. To SSH in, simply type,
ssh pi@<pi-ip-address>
There are many ways to identify the pi’s IP:
- Login to your router’s admin dashboard and look for it there.
- Run
nmapon your terminal and look at the list of devices by IP. ssh pi@raspberrypi.localthis will automatically plugin your pi’s IP address assuming you only have one pi on your network.
I used a Linux machine to connect to my pi, but for Windows users, you will need to install an additional tool — Putty , in order to SSH into another computer.
The first time you connect, it will ask you if you trust this fingerprint. Select Yes.
You will need to enter your pi’s password, which should be raspberry unless you changed it.
If you connect successfully, your terminal’s prompt will change to pi@raspberrypi
Note: For more information on setting up SSH — https://www.raspberrypi.org/documentation/remote-access/ssh/README.md
Static IP address
When setting this up, I personally like to set a static IP so I can easily access it from any device without having to look for its IP every time. So first check your pi’s IP address, enter the following in the terminal connected to your pi via ssh (all of this is happening on your pi now through your host computer),
ifconfig
Then we need to edit the dhcpcd.conf file,
sudo nano /etc/dhcpcd.conf
And enter the following, making sure you have added your pi’s IP address,
interface eth0
static ip_address=192.168.0.100/24
static routers=192.168.0.1
static domain_name_servers=192.168.0.1
interface wlan0
static ip_address=192.168.0.100/24
static routers=192.168.0.1
static domain_name_servers=192.168.0.1
sudo reboot to make sure you restart with the new static IP address :)
After that, let’s quickly update the system:
sudo update
sudo upgrade
sudo reboot
Note: If you want to connect to your pi using your phone, you can use JuiceSSH . Make sure you are on the same network as your pi in order for it to work.
Install IPFS
Not much left now. The installation is pretty straightforward and you should have your node running in no time.
Get IPFS download link
The installation files for IPFS depends on the architecture of your computer. We need to check what type your pi has. Enter the following:
uname -m
This should give you some output like armv7l. armv7 and below are 32 bit computers and armv8 and above are 64 bit.
Note: For a complete listing of the ARM architecture and what bit is your pi — https://en.wikipedia.org/wiki/ARM_architecture
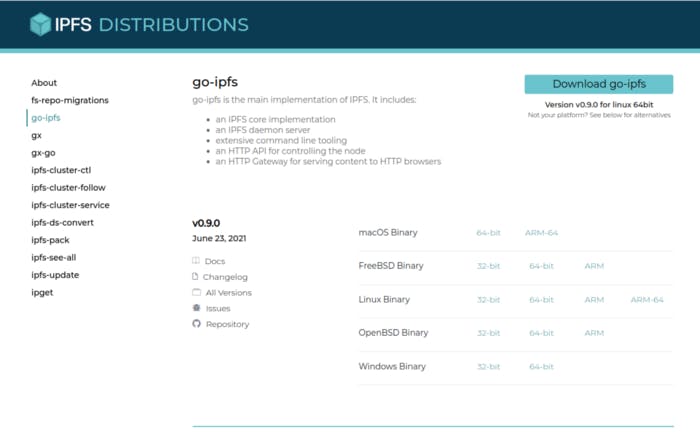
Now go to IPFS’s download page — https://dist.ipfs.io/#go-ipfs You will be downloading go-ipfs to run a basic node. Based on your architecture, copy the link of the appropriate installation files under Linux Binary.
Installing IPFS
As my pi had armv7l this is a 32 bit chipset and I used this link — http://dist.ipfs.io.ipns.localhost:8080/go-ipfs/v0.9.0/go-ipfs_v0.9.0_linux-arm.tar.gz. Enter the following in your pi terminal without the $ (that is just the terminal prompt which I placed in the code below to show each command separately):
$ wget http://dist.ipfs.io.ipns.localhost:8080/go-ipfs/v0.9.0/go-ipfs_v0.9.0_linux-arm.tar.gz
$ tar -xvzf go-ipfs_v0.9.0_linux-arm.tar.gz
$ cd go-ipfs
$ sudo bash install.sh
$ ipfs --version
Note: Complete IPFS installation instructions — http://docs.ipfs.io.ipns.localhost:8080/install/command-line/#official-distributions
ipfs --version is run to check if it all installed properly. This doesn’t mean that ipfs is actually up and running yet. We still have to start up the daemon.
Configure IPFS node
Now that you have IPFS installed, we need to initialise the repository before we start it.
ipfs init
You will see a welcome message and some useful tips. Copy them out if you want to refer to it later.
Running IPFS Daemon
There are two ways to get IPFS running.
- Run the command
ipfs daemon. This will start up your ipfs node immediately. But you will notice that the moment you close the terminal window, the daemon will shut down as well. We want a way to keep the daemon running as a service. - Create a service unit for the IPFS daemon —
sudo nano /etc/systemd/system/ipfs.service
Paste the following into the file:
[Unit]
Description=IPFS Daemon
After=network.target
[Service]
Type=simple ExecStart=/usr/local/bin/ipfs daemon --migrate=true --enable-gc=true
User=user
Restart=on-failure
[Install]
WantedBy=default.target
Save the file Ctrl+O, Ctrl+X. Start the service by running:
sudo systemctl start ipfs
Test your node by running,
ipfs swarm peers
If you see a list of Peer IDs getting listed, then your node is up and running. Yey!
Reduce Max Storage
Since I was running a test node, I used a small 16GB SD card. The default allocated repository size is 10GB which technically should be ok but I thought of putting it at 5GB, just to explore how this goes.
sudo nano ~/.ipfs/config
Scroll and look for
"Datastore": {
    "StorageMax": "10GB",
...
Change the "10GB" to "5GB" . Save the file. Restart the ipfs daemon sudo systemctl restart ipfs.
Note: More information on configuring an ipfs node can be found here — http://docs.ipfs.io/how-to/configure-node/
Adding and Pinning your files to the node
Now that the node is up and running. Let’s actually add a file to it. First we will create a simple text file via the SSH terminal.
echo "Hello World" >> hello.txt
This will create a file called hello.txt in your pi’s home directory. Now we need to add it to our ipfs repo.
ipfs add hello.txt
You should get a messaged something like this:
added QmWATWQ7fVPP2EFGu71UkfnqhYXDYH566qy47CnJDgvs8u hello.txt
 12 B / 12 B [=========================================================] 100.00%
The numbers and letters after added is the CID of your file. To share and view this file elsewhere, form a link with the CID like so https://ipfs.io/ipfs/<CID>
The file I added can be viewed here — https://ipfs.io/ipfs/QmfXySF3a7XVcttM9cvfu6DQFKmSvw2faKcinNeinGWXzV It can take some time to load the first time. Depending on how far the data has to travel.
Generally doing ipfs add also pins the file to your local repository and you can check that by running ipfs pin ls.
Just in case, you can run ipfs pin add <CID> after you add the file to pin the file to your local repository.
To add more than text files to your node, you can use Filezilla to copy across files to your pi and then add/pin them.
Note: All command line commands can be found here — http://docs.ipfs.io/reference/cli/
Why is pinning important?
IPFS nodes have an automatic garbage collector that cleans out all unused files every few hours or so (depends on what you set in your config file). Although the gc is disabled by default, I have set it as enabled in the service unit file. Even if you disable it, an unpinned file could get cleared out by your garbage collector so it’s always better to pin your file to a node.
External Pinning Services
If you are not confident that your node will run 24/7 and you want to use it, maybe as a CDN for example, then it’s worth also pinning your files to some services:
- https://pinata.cloud/
- https://nft.storage/ And that’s all!!! Congrats! You are now contributing towards an innovative future.
Hope this guide was useful and if there are any comments/edits/problems/questions, please do ask away :) All feedback is welcome. Feel free to ask any questions via Twitter as well — https://twitter.com/neha_m25